I am sure watching the current world events unfold, you, like myself, are left with a very strong and growing feeling of impending doom. Besides the ever-increasing threats of nuclear war and its horrors, there are wars brewing in China/Taiwan, Korean peninsula, Ukraine/Russia, and of course the always horrible wars between Israel and practically everyone else.
Putin has warned the United States, Britain, and the EU nations that he has had enough and has moved nuclear subs off our coast and the English coast. The world has never been closer to nuclear Armageddon and many say we are in the End Times.
I don’t know what is going to happen, but it might be very ugly, and water will be more essential for your survival than anything else. So I thought, I better teach my readers how to filter and purify their own water supply. It is not as hard as you think. A little planning now could mean a world of difference in a crisis.
Kinky Fact/Nerd Food: There is a general Rule of Threes when it comes to survival. You can live three minutes without air, three days without water, and three weeks without food. Now, there are factors that change those numbers. For example, if you are morbidly obese you may last a very long time without food, on the order of months. But generally, for most of us, the Rule of Threes holds true. Sometimes, there is a variation that also states that three hours without shelter, that is presuming you are in some life-threatening environment.
So, as you can see, you only have three days without water, so other than the air you are breathing, water is the most essential factor in your immediate survival. Hence the importance of this article, and why I want you to print out a hard copy and keep it somewhere, in case you don’t have access to your computer. Share copies for your friends and family as well and tell them about the amazing Medical Underground!
KNOW YOUR WATERS: GREY WATER AND BLACK WATER
You do not need to purify or sterilize water that you are using for household cleaning, laundry, or personal hygiene. You can use rainwater, or non-purified water for that as well as flushing your toilets. Cleaning water enough to make it potable is both time and energy consuming and in a grid down situation you want to conserve your energy use as much as possible.
Many folks living off the grid in remote areas or areas with little rainfall and no central water supply often develop ingenious systems to repurpose the water from their homes that was used in showers, baths, kitchen, and bathroom sinks.
This is not to be confused with Black Water, which is from your toilets, kitchen, and dish washers. They recapture this water and use it in their gardens and for other purposes that do not involve drinking or cooking.
There are now elaborately designed grey water systems for your home the plans of which are available online. Some very wise preppers have even utilized nature to filter water with a system that goes thru various planters. Here is an example of such a system:
Since Grey Water might very well contain bacteria and viruses as well as chemicals from laundry etc. it should not be used on root vegetables or spray it directly on any edible parts of your plants. However, that being said, in a bad survival situation and you had no other options, I would still take the chance of watering any crops with grey water.
Examples of root vegetables are onions, garlic, carrots, rutabaga, Jerusalem artichokes, radishes, daikon, parsnips, and ginger. Here is a chart showing an even more complete listing of root vegetables.
HOW THE MEDICAL UNDERGROUND RECOMMENDS TO FILTER AND PURIFY WATER TO MAKE IT DRINKABLE
Water is the elixir of life, without it, nothing on this planet can survive. That includes everything from the largest animals and plants to the smallest microbes. They all have an absolute need for adequate water supplies to live.
In a grid down situation where you need to disinfect and purify your water, you will need a minimum of a half gallon a day, in normal weather and with normal exertion. If you are hiking a distance or traveling over land your water needs will double to one gallon a day.
Any water you come across must undergo a two-step process. It first must be filtered to remove visible impurities and then sterilized to kill off the invisible microorganisms. So many people make the mistake of thinking that clear “clean looking” water is safe to drink. Nothing is further from the truth, and that can be a fatal mistake.
STEP ONE: WATER FILTRATION
This first step involves running your water through a physical filter that will remove the visible suspended particles, debris, dirt, and large impurities of any type.
There are various ways to do this, and several different techniques described online. The most effective of them involve passing water through several different mediums such as cloth, sand, activated charcoal etc.
HOW TO MAKE A BASIC WATER FILTRATION SYSTEM FROM HOUSEHOLD ITEMS
This is a very useful skill to have mastered and will potentially save your life in a grid down situation.
You can use any size container you want. Naturally, the larger the container the greater volume of water that can be filtered. I like to use 2 five-gallon plastic buckets. If you have food grade ones all the better. They are available in white at Home Depot or Lowes, but any bucket will do in a pinch. You can make a small version of this as well using a large plastic two-liter soda bottle, for example.
The first step is to drill holes in the bottom of the first bucket, that is the one you are using to construct your multi layered filter. If you are using a water bottle you can punch several holes with a small nail or drill it.
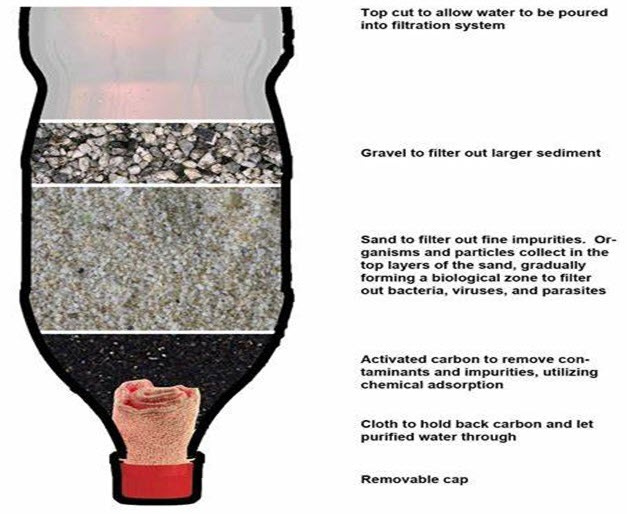
If you are using the two-liter bottle then cut the bottom of it off and stuff the neck of it with two cotton balls, place a coffee filter over the mouth of bottle and screw on the bottle cap over it tightly. Sometimes that is tricky. If it proves to be problematic then use a strong rubber band to hold the coffee filter in place, securing it tightly so there is no leaking.
Now you can invert the bottle and place a piece of cloth in the bottom and alternate layers of activated charcoal, sand and gravel.
In the filtration bucket, place a thin piece of cotton cloth, from an old undershirt, for example. Over that place several inches of activated charcoal, on top of that place a layer of several inches of sand, and on top of that place crushed rocks or aquarium gravel.
An alternative method for the bucket system is to use multiple buckets, each with only one of the filtering mediums filling the entire bucket. For example, sand or activated charcoal or gravel and placing the buckets on top of each other and allowing the water to percolate through each medium until it fills the empty bucket on the bottom. This method will allow you to filter a greater volume of water at any given time.
You now have constructed your filtration system, and you are ready to rock and roll and make yourself some clean delicious water.
Note: There are some very ingenious alternative systems you can make that are inexpensive and work as well as the most popular of the water filtration systems, the Berkey filters. This clever method utilizes the filters of the Berkey system without the expensive stainless-steel buckets. All you have to do is buy the Berkey filters and two buckets and a PVC spigot and you are in business for a lot less money. Check out the diagram below, it couldn’t be simpler.
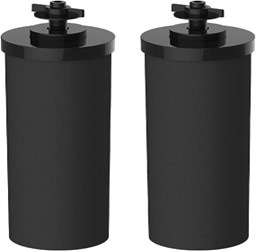
The black replacement filters for the Berkey water filtration system are advertised to last for 6,000 gallons of water filtration each.
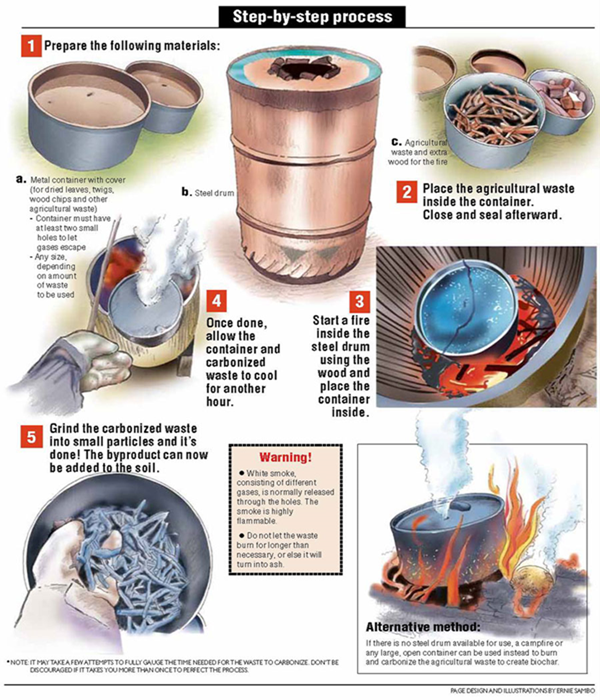
Kinky Fact/Nerd Food: If you do not have activated charcoal or if you simply exhaust your supply of it, you can make your own biochar and use that.
What is Biochar, you ask? Good question grasshopper. Biochar is a black lightweight substance made from the incomplete combustion of organic materials, resulting from a process known as pyrolysis, where you burn wood, for example, at high temperatures and then starve the flames of oxygen and the result is the production of black carbon residue called char and grey ash.
Here are two different ways to make your own biochar, which is also a wonderful soil enhancer for your garden, wildly increasing its fertility.
STEP TWO: HOW TO PURIFY YOUR WATER TO KILL OFF ANY MICROORGANISMS
This is a very important step if you don’t want to get sick from your water supply.
HOW TO DISTILL WATER
The absolute gold standard for water purification is to distill it. Distillation kills all microorganisms including bacteria, fungi, and even viruses. It also removes everything, leaving you with absolutely pure water with nothing else. It has its limitations; it is an energy intensive and slow process and lends itself to producing small quantities of water at a time.
As it always seems, there are ingenious methods of doing everything online. Here is a very simple way to distill small quantities of water on your stovetop, grill, or campfire.
Take a large pot and fill it with several inches of water, enough to make a smaller bowl be able to float in it. Remove the bowl, bring the water to a boil, then float the smaller bowl in the water, invert a large pot cover upside down on top of the pot over the floating bowl, and fill the hollow of the pot cover with ice.
As the water continues to boil it will condense on the underside of the pot lid (speeded up by the temperature difference caused by the ice cubes but will work without the ice if you don’t have any).
Continue to boil off the water until it fills the small bowl with distilled water that has dripped into it from the inverted pan lid. Allow it to cool and remove the lid and take out the small floating bowl that is now filled with pure distilled water.
TRADITIONAL WATER DISTILLATION METHOD Of course, you can also construct a traditional still made of beakers and Bunsen burners with glass flasks, but in reality, how many of us have either the capability or the materials to do so. However, you can Gerry rig a system that will work without too much hassle.
There is no other method of water purification that will give you as pure water as you will get with distillation. It is just a pain in the ass.
How it works is that water is boiled off and evaporates, entering a cooling chamber where it now condenses. This condensed water is also called a distillate, is perfectly pure. The evaporation/condensation process has effectively removed everything from the water and has killed all microorganisms (germs).
HOW TO MAKE A SOLAR STILL
Another method for making your own distilled water is by constructing a solar still. They are very easy to make with materials you already have in your garage. Here is how it is made:
In a dire emergency, you may not have access to niceties like pots and fire. It’s still possible to distill water using a homemade solar still. This method of distillation uses the heat of the Sun to evaporate water that you can collect to drink.
You can use any source of moisture, such as urine, dew, plants, damp soil, or sea water. However, be careful to avoid poisonous plants because volatile toxins may contaminate the distilled water. Cacti, ferns, and grasses are generally safe to use. The major disadvantage to this method is that it takes a long time to collect water.
Dig a hole in the ground in a sunny location.
Place a cup in the center of the bottom of the hole to collect distilled water.
Pile damp non-toxic plants or moist soil around the outside of the cup.
Cover the hole with a piece of plastic and secure it with rocks or soil. Try to seal the hole as well as you can to prevent moisture from escaping. The plastic traps the water and also traps heat via the greenhouse effect.
Place a pebble or other small weight on the plastic right above the buried cup. As water evaporates, it condenses on the plastic and falls toward the depression, finally dripping into the cup.
Don’t mess with your set-up except to drink water or add more plants or soil. Every time you unseal the plastic, you release moisture and slow down the process.
COMMERCIALLY AVAILABLE WATER FILTRATION SYSTEMS
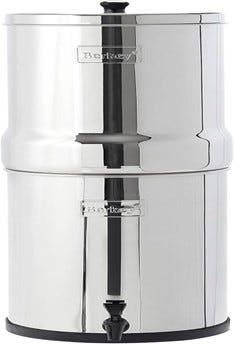
The most famous of these are the Berkey family of water filters. They look like large stainless-steel coffee pots and are very effective at water filtration and purification. They contain four water filters that have very small sized pores on the micron level, effectively trapping bacteria as well as other contaminants.
You can pour pond water in the top and from the bottom you will have clean, delicious water.
As I described above, you can purchase the filters on Amazon and build your own system for a lot less money using five-gallon buckets on top of each other with the filters attached to the upper bucket.
The micro-pores that make up Black Berkey filters are so small that they prevent micro-particles such as viruses and bacteria from getting through. Even food dyes can’t get through and the filtered water becomes crystal clear!
The Berkey filters tend to be more expensive than other brands, and I have seen reviews online and the results are good even with the less expensive brands. I highly recommend this type of water purification system. They are cost effective in the long run and if you stock up on some filters you will be all set. Naturally, as I demonstrated earlier in this article, you can buy the filters and make your own system very inexpensively.
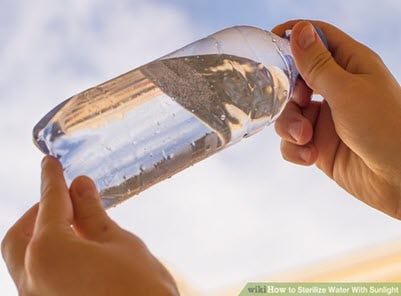
ULTRAVIOLET LIGHT FOR WATER STERILIZATION
Ultraviolet light kills all microorganisms in water. For that reason you will often see ponds with a pump shooting water in the air to expose it to sunlight to keep the bacterial counts down. It is a very effective method and very inexpensive, especially if you get a solar powered water pump.
You can do this on a small scale using clear plastic or glass bottles, preferably glass so there is no microplastic and forever chemical exposure from the plastic. But either one will work for our purposes.
A quick review of sunlight’s UV (ultraviolet) bands shows that there are three different wavelengths of UV light, cleverly named A, B, and C. Ultraviolet C is what kills microbes of all types by penetrating and breaking down their genetic material and killing them. It was first used in war-torn Lebanon during the 1980’s and now is widely used throughout the world.
NOTE: UV light treatment of water does not filter it, only sterilizes it. You need to first filter the water as described earlier in this article. Removing the particulate matter (floating junk) that is suspended in water will allow the sunlight greater penetration without reflecting it away.
The amount of time you must treat water with UV light depends upon the weather conditions at the time. If you are lucky and it is a sunny day then 6 hours of direct sunlight will do the trick. If it is a cloudy period then two days of exposure will be required.
Besides killing bacteria of all types, UV treatment will also kill viruses such as flu, rotavirus, polio, and hepatitis.
Here are the steps you need to do to sterilize your water:
Fill 2/3rds of a transparent PET plastic bottle with clear water. Keep in mind that you need to use clear water otherwise it will not necessarily be completely disinfected. Turbid water will need to be pre-treated before disinfecting.
Shake the water bottle to agitate and oxygenate the water. Oxygen helps kill microorganisms as well as sunlight and the two work very well together in a process known as Photo-oxidation.
Then, completely fill the bottle with water.
Place water bottle horizontally in direct sunlight. This is to maximize the surface area of impact.
You may place the bottle horizontally on the roof, the ground, or any flat surface such as the top of your pack when hiking. Leave it for a minimum of six hours under direct sunlight.
If it’s cloudy, the water needs to be left undisturbed for two days for effective disinfection.
To make the process more efficient, you can paint or put some black tape on the bottom surface of the bottle – black absorbs more heat and helps disinfect the water more effectively.
You may also place the bottle on metal or even black plastic. Placing the bottle on a reflective surface also maximizes heat and radiation.
After you wait the appropriate 6 hours (for sunny conditions) or 2 days (for cloudy conditions) the water is safe to drink (not considering other pollutants and chemicals).
Kinky Fact/Nerd Food: UVC (ultraviolet C) will completely inactivate (kill) Covid-19 after nine minutes of exposure to sunlight! For those of you who are still worried about Covid-19, it has done what I predicted four years ago. Following the evolutionary path of all viruses, it mutated to more contagious and less lethal. Currently, depending upon your immune status, if you are in reasonably good health Covid-19 will be little more than a mild cold for you.
BOILING WATER FOR PURIFICATION: THE MOST COMMON PRACTICE
Most people are aware that boiling water is a way to purify it of any microorganisms so that it is potable. Let’s look at how it is done.
Keep in mind that boiling water kills off bacteria and parasites, but does not remove toxins such as heavy metals, pesticides, and fluoride among others. You can remove them by first filtering your water through an appropriate filter that has activated charcoal that will “adsorb” (chemically bind) chemicals and toxins on its extensive surface area.
You probably can drink that water as it exits with no problem, depending upon the size of the filters, but if you want to be sure it is free of viruses and bacteria, then you have to boil it.
However, if you are in a rush in a desperate survival situation then you can drink it after just boiling it, especially if you think the water is clean to start with.
Fill the pot you want to use with water, and if possible, cover it with a lid. This will speed up the time it takes to reach a full rolling boil. By rolling, I mean, not tiny bubbles coming off the bottom of the pot, but rather the water turning over “rolling” on itself. That is a full boil, and you need to do that for from five to ten minutes minimum. I prefer ten minutes; this should sterilize your water of bacteria and viruses. After ten minutes of rolling boiling, you should remove the pot’s lid to allow any gases formed such as chlorine (from water from a treatment plant), to escape.
USING SWIMMING POOL WATER TO DRINK
For chlorine to be removed from water you have to boil it longer, from 15 to 20 minutes. That is important to understand, especially if you are using your pool as a source of water in a SHFT (shit hits the fan) survival scenario. (see the section below on using bleach and chlorine hypochlorite to disinfect water for more details).
When you are done you can pour it into a clean container. I would strongly recommend a glass or ceramic type container, so you are not exposed to microplastics (see article from two weeks ago at the Medical Underground) and forever chemicals leaching from the plastic. Pouring your purified water into a copper pitcher will help it remain clean longer, due to the antibacterial effect of copper on water.
Note: Water purified by boiling will remain good for about 24 hours. Some “experts” say that boiled water if placed in a clean closed container and kept in a cool place will last for up to six months.
The boiled water will have a flat taste due to loss of oxygen. This can be remedied by pouring it back and forth between two clean pitchers to aerate it and dissolve more oxygen into the water giving it a “fresher” taste. You can also add a pinch of sea salt to each quart or liter of water to improve the taste.
Note: It is safe to use boiled water for baby formula, just make sure it cools down first. You don’t want to freak out the little buggers.
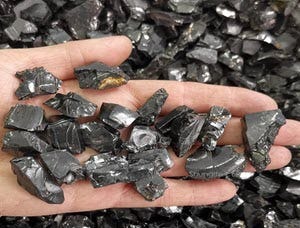
SHUNGITE STONES
Shungite is a rare black stone made of up to 99 percent carbon. It’s mainly found in Shunga, a village in Karelia, Russia.
The stone has a unique composition. It contains fullerenes, or 3-D spherical molecules made of 60 carbon atoms. These molecules are hollow and sometimes called buckyballs.
The origin of shungite is a mystery. Typically, materials made of carbon come from decayed organic substances like old forests. But the stone is thought to be at least 2 billion years old. This is before organic life existed on the planet.
Some theories of shungite’s origins include:
a large meteorite collided into Earth and deposited shungite into the ground
shungite formed due to microorganisms in nearby water
the composition of organic matter in sedimentary rocks changed over time.
SHAMELESS PLUG: I wrote an article on February 26th of this year on Carbon 60. There is also another article back in the archives on Activated Charcoal in September of 2023. Reading both will greatly enhance your understanding of how carbon is so essential and its varied uses. It is also a shameless plug of my Substack columns, LOL. You may also find all of my articles by visiting https://medicalundergrounddoc.com/access-articles/
The carbon 60 or fullerenes or bucky balls that make up shungite stones are a type of carbon nanostructure, meaning very small carbon, that is shaped like a soccer ball with a hollow core that irreversibly traps microorganisms. They also damage the cells walls of both bacteria and viruses, killing them, hence its utility in purifying water. In addition to which carbon 60 pulls electrons from microbes and kills them.
Kinky Fact/Nerd Food: A nanostructure is something intermediate in size between microscopic and molecular in size. The nanocarbon or carbon 60 found in shungite stones WILL REMOVE RADIOACTIVE MATERIAL FROM WATER AND INACTIVATE IT. Activated charcoal will remove up to seventy percent of its own weight in radioactive materials! That my friend is pretty impressive and another reason to keep a good supply of activated charcoal in your home.
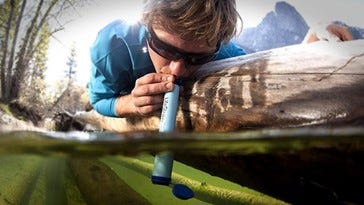
LIFESTRAW : AMAZING TECHNOLOGY IN A THICK STRAW
LifeStraw was developed for people living in Third World hell holes that have no access to clean drinking water. It is an amazing technology, and I strongly encourage my readers to stock up on these.
Note: If you have a choice choose to drink water from a running water source as opposed to still water like a pond or lake. Running water has less chance of contaminants and the movement both aerates it and helps filter out sediment and other large particular matter.
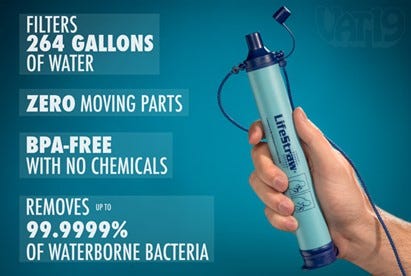
LifeStraw is a tube about 9.25 inches (23.5 centimeters) long and about an inch (2.5 centimeters) around the outer shell of the unit. It is made of a durable plastic, with a string attached so users can wear it around their necks. To use it, a person simply sticks the LifeStraw directly into the water source and drinks as he or she would from a normal straw.
The first iteration of LifeStraw used iodine to kill bacteria, but the 2012 version contains no chemicals. Instead, the product incorporates mechanical filtration. When you suck on your LifeStraw, water is forced through hollow fibers, which contain pores less than 0.2 microns across ─ thus, a microfiltration device.
Any dirt, bacteria, or parasites are trapped in the fibers, while the clean water passes through. When you’re done drinking, you simply blow air out the straw to clear the filter. You can down a quart of water in eight minutes using LifeStraw.
One straw will filter 1,000 liters or about 264 gallons of water, thus a handful of these which retail for about twenty bucks each is a great backup system for filtering water. It will last one person about a year.
LifeStraw will remove sediments, bacteria, and parasites from drinking water, making it drinkable instantly.
LifeStraw also produces a family size water filtration system (called LifeStraw Family) using the same technology but scaled up to a larger size. The advantage being its large capacity, as well as its ability to remove viruses which the small personal LifeStraw cannot, due to the smaller pore size of its filter. Here is a description of its use right from the LifeStraw website:
LifeStraw Family is a larger unit that can purify enough water for several people at once. This higher-capacity product can handle a family of five for three years, or roughly 18,000 liters (4,755 gallons), according to the company. The product consists of a blue bucket with a prefilter insert, a long plastic tube, and a filter cartridge with a tap attached to draw out the water. No electricity or battery power is required.
Gravity guides water through a series of filters. The user pours water into the prefilter and bucket at the top of the unit. The water then moves down the tube and runs through the same type of hollow fiber technology that the personal LifeStraw uses, but these pores are actually 0.02 microns across, which makes it an ultrafiltration device. (It also means the family unit can filter out viruses, while the personal one can’t.)
The user can then pour the newly purified water from the tap. The person can clean the filter by closing the tap and pressing a red squeeze bulb to release the collected residue and can use a rag to wipe the prefilter bucket. LifeStraw Family can filter about 9-12 liters (2.4 to 3.2 gallons) of water per hour.
WATER PURIFICATION TABLETS
A very convenient, cost-effective and practical way to purify water and make it potable is by using water purification tablets. They come in various brand names such as Aquatabs, Potable Aqua, and Micropur.
Most water purification tablets come in three general categories: chlorine, chlorine dioxide, and iodine. All are effective in killing viruses and bacteria, but some, like chlorine and iodine, struggle when confronted with Cryptosporidium and Giardia which gets KO’d in the first round by chlorine dioxide.
For those of you who are not familiar with cryptosporidium and giardia, these both are parasites that lead to severe gastrointestinal problems and copious amounts of watery diarrhea. Both originate in contaminated water from lakes, streams, and rivers.
Both cryptosporidium and Giardia are found extensively in waterways in the United States and will make you vey sick with a severe diarrhea that can dehydrate and kill you, nothing to toy with.
If you suspect that the water you have come across in a lake or a stream might not be safe to drink, then drop one of these small white tabs into the container of water and wait about 35 minutes and it will be potable.
According to some independent reviews of water purification tablets Potable Aqua seems to be the number one rated brand.
When using tablets, because they take so long to work, use two canteens so you can drink treated water from the first canteen on the go while the second canteen is treating your water — then alternate.
Pay attention to the water temperature. Chemical treatments work faster in warm water than they do in cold water — almost twice as fast.
Bring along a clean bandanna or coffee filters to help strain out the chunks from your water, cheese cloth will also work.
Better yet, get your water from low turbidity sources if you can, this way you need to do less or no filtering to remove particulate matter.
CHLORINE AND CALCIUM HYPOCHLORITE (POOL SHOCK) TO PURIFY YOUR WATER
Chlorine is very effective for cleaning water, and most commercial and residential pools use it for that purpose, as we can all attest to from our “burning red eyes”.
Using chlorine bleach for disinfecting water works very well. The problem is liquid chlorine takes up a lot of space and it has a very short shelf life and weakens rapidly. Use it at a rate of ten drops per gallon or a quarter of a teaspoon per gallon will do the trick. It does leave a chemical aftertaste of chlorine, but it will kill most bacteria found in water.
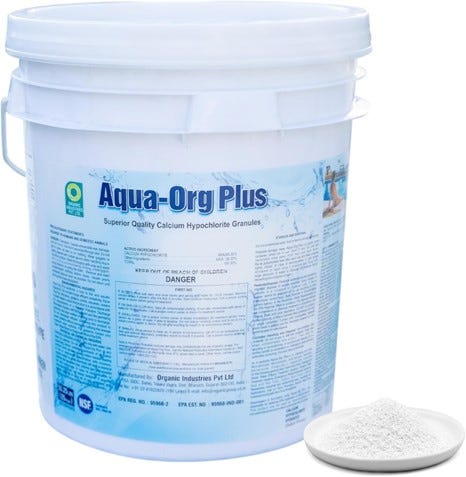
Calcium hypochlorite, which is the main ingredient in what is known as pool shock which is used when you first open your pool in the spring and remove the cover and find your previously clear water is now dark green with what looks like pond scum and teaming with germs of all types.
Calcium hypochlorite has an amazing long shelf life, if kept dry it will last for decades without any weakening of its potency, and is very inexpensive in price, making it affordable for just about anyone’s disaster planning budget.
Here is a table from the EPA website on how to use bleach to purify water. This takes into account the two different strengths of store-bought bleach available, either 6 or 8 percent:
HOW THE MEDICAL UNDERGROUND USES CALCIUM HYPOCHLORITE TO DISINFECT WATER
The best description I could find came from the EPA website which gave the following method for using calcium hypochlorite to safely disinfect your water. Granular calcium hypochlorite. The first step is to make a chlorine solution that you will use to disinfect your water. For your safety, do it in a ventilated area and wear eye protection. Add one heaping teaspoon (approximately ¼ ounce) of high-test granular calcium hypochlorite (HTH) to two gallons of water and stir until the particles have dissolved.
The mixture will produce a chlorine solution of approximately 500 milligrams per liter. To disinfect water, add one part of the chlorine solution to each 100 parts of water you are treating. This is about the same as adding 1 pint (16 ounces) of the chlorine solution to 12.5 gallons of water.
If the chlorine taste is too strong, pour the water from one clean container to another and let it stand for a few hours before use.
CAUTION: HTH is a very powerful oxidant. Follow the instructions on the label for safe handling and storage of this chemical.
If you have been reading my books or my Substack columns you know how much of a fan of iodine I am, not only for its water purification properties but also for its overall health enhancing properties. Iodine is a wonderful choice for purifying your water since most of us are low on iodine due to its depletion in our industrially farmed soils. It will also give you a bolus of iodine.
Iodine is amazingly useful to disinfect not only any surface but also to disinfect water since it kills all types of microorganisms from bacteria to fungi to viruses. Iodine is not protective against parasites such as cryptosporidium and giardia, you will have to follow up with chlorine dioxide tablets to kill them off.
Iodine tablets are the easiest way to purify your water. Brands such as Potable Aqua (iodine tablets) and Potable Aqua Plus which clears or clarifies the water. Potable Aqua tablets have tetraglycline hydroperiodide as its active ingredient, which is a form of iodine.
Use two tablets per liter of water, wait a half hour, and then put in two tablets of the Potable Aqua Plus which clarifies the water removing any odor and discoloration from the iodine and any after taste. That takes another five minutes, and your water should be ready to drink. The tablets do not have to be totally dissolved.
This is a fast and effective way. However, there are many forms of iodine that you can use to purify water, and you should keep a lot of it on hand, since it has so many other uses from treating skin infections and even athletes’ foot to disinfecting wounds and supporting thyroid function.
Here is how the EPA recommends using iodine:
Common household iodine (or “tincture of iodine”). You may have iodine in your medicine cabinet or first aid kit. Add five drops of 2% tincture of iodine to each quart or liter of water that you are disinfecting. If the water is cloudy or colored, add 10 drops of iodine. Stir and let the water stand for at least 30 minutes before use.
You can use household products like Betadine (10 % Povidone iodine) at the same formula of 5 drops per quart or 20 drops per gallon of water you want to disinfect.
I would highly recommend to my readers to stock up on iodine such as Betadine, which has so many medicinal uses for wound care and disinfection.
The Medical Underground also recommends taking iodine supplements in the form of Kelp. Kelp, which is giant seaweed, grows in “kelp forests” along coastlines and is very nutritious. Besides containing large amounts of organic iodine, it also has all the essential amino acids (remember, essential means that it is essential that you get them in your diet, since your body cannot construct them as it can all the non-essential amino acids).
Well, that concludes another exciting episode of The Medical Underground, and you have just learned a host of ways to purify water, for any situation that may arise.
Hopefully, you found this week’s article to be both educational and entertaining. If you are not already a subscriber, then hit that subscribe button now!
If you are already a free subscriber now is the time to show me your appreciation of all the hard work it takes to produce these cutting-edge medical articles, and DO THE RIGHT THING AND BECOME A PAID SUBSCRIBER. It is less than seven bucks a month and will go a long way to supporting The Medical Underground. THANK YOU SO MUCH, IT IS GREATLY APPRECIATED!
Until we meet again, May God Bless You and Your Family and the United States of America. And for those of you who, like me, are believers in Jesus Christ, always remember this, for us MIRACLE SHALL FOLLOW MIRACLE AND WONDERS SHALL NEVER CEASE.
This disclaimer provides that such medical information is merely information – not advice.
If users need medical advice, they should consult their doctor or other appropriate medical professional.
















Great article! I've taken a course on water systems and you really covered a lot of low tech methods. Resource site - SSWM Toolbox, sustainable water management https://sswm.info/about-toolbox - small community system examples